
Distant Travels
How to set up LayeredImages in Ren'py (& new sprite teaser!)
Hi there!
I don't bring much VN news, other than that I'm actively working still. There's a lot of new sprites and new codes and I'm having a lot of fun working on it. It'll be ready when it's ready.
Until then, I've been asked a few times to help set up LayeredImages so I figured I'd write a short guide out. Feel free to ask me to clarify and I'll update this.
A guide to Ren’py LayeredImages - by @GruntSteel
Foreword
For this guide I will be using the character Mike from Distant Travels. While the image setup for the character is what I’d suggest most people use, your art style and setup might vary. I suggest reading through the entire guide before starting, to know a few more possibilities before setting up your files and layer structure.
We’ll start at the basics and go all the way to the cool stuff.
So, if you get to a point where you have all the functions you need, you don’t have to follow through the rest.
As another note, there are things that are required and things that might simply help you later, I will mark these optional things out.
File Structure & Setting up the Image Files
To begin setting up our LayeredImage, we first have to decide the layer structure for our art. As a LayeredImage in Ren’Py really just is the same as a .psd, .mbp or .clip file in terms of “structure.” Meaning, we have an order of layers of different images, and they will show up in the order we put them in.
However, before beginning we’ll have to take a look at the base structure of the code in Ren’py.
Simple Code Structure for a LayeredImage
A LayeredImage has a similar setup to your average layered image in your art program (photoshop, csp etc)
They are structured in a folder-like structure using Groups and Attributes. There are also the Always and If structures, but we’ll get to those later.
A group can contain different attributes or images, and only one attribute inside a group can be shown at once. Meaning that from the code snippet below, only one of the attributes shirt and tshirt can be shown at once, because they both reside within the group “shirts”.
Another thing to note is that the images will load from top to bottom in the script.
Here’s an example of code for a simple LayeredImage.
layeredimage mike:

    group body:
        attribute body:
            "sprites/mike/expressions/mike_body.png"

    group shirts:
        attribute shirts:
            "sprites/mike/shirts/mike_shirt.png"
        attribute tshirt:
            "sprites/mike/shirts/mike_tshirt.png"

    group pants:
        attribute pants:
            "sprites/mike/expressions/mike_pants.png"
        attribute shorts:
            "sprites/mike/expressions/mike_shhorts.png"

    group expressions:
        attribute neutral:
            "sprites/mike/expressions/mike_neutral.png"
        attribute happy:
            "sprites/mike/expressions/mike_happy.png"
        attribute sad:
            "sprites/mike/expressions/mike_sad.png"
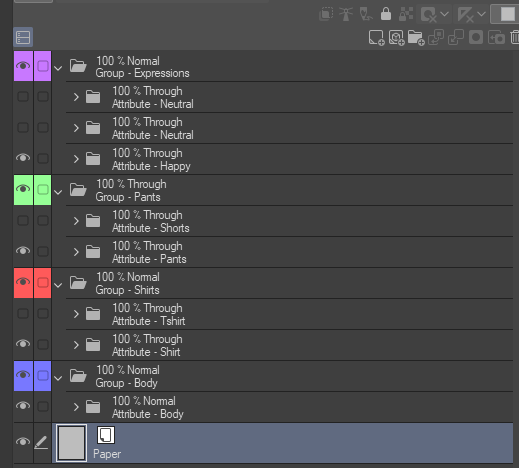
The above snippet of code can be compared to the below picture of a .psd file.
Notice how the body is at the top of the code, and the bottom of the image in photoshop? Meaning it’ll be the lowest layer of our image.
So to reiterate:
1) The order of “groups” in your layered image, the further up the attribute/group is in the layered image code, the further down it will be in the actual image.
2) Groups are like folders, only one attribute from a group can be shown at once. We use this for things like different pants or shirts.
With this in mind, it’s important that we think in a group sense when deciding the order of layers.
For example, in Mike’s case I apply the shirts before the pants and the image is drawn accordingly. So, if Mike has both a shirt and pants on, the pants go above the shirt.
Outliers to this are completely fine, we’ll get to that after setting up the basics. Put the outliers in their own group for now.
Next up, the actual image specifics.
Standardizing Blank Space in Image Files
For our layered image it’s important that the px height and width is the same for every piece of a character.
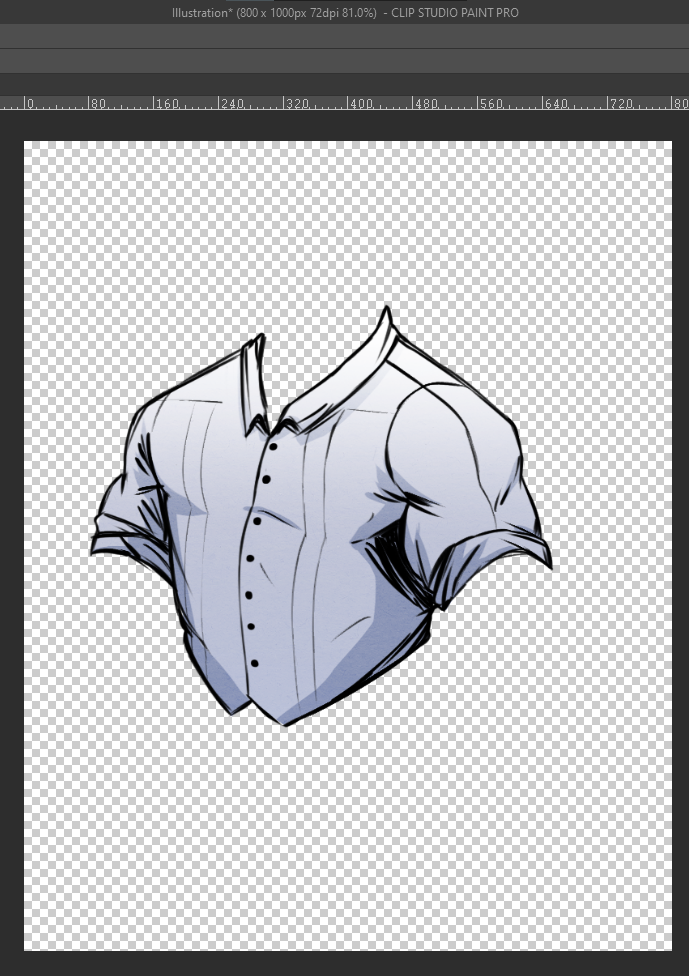
Every piece of clothing etc will be floating in blank pixels at the right location.
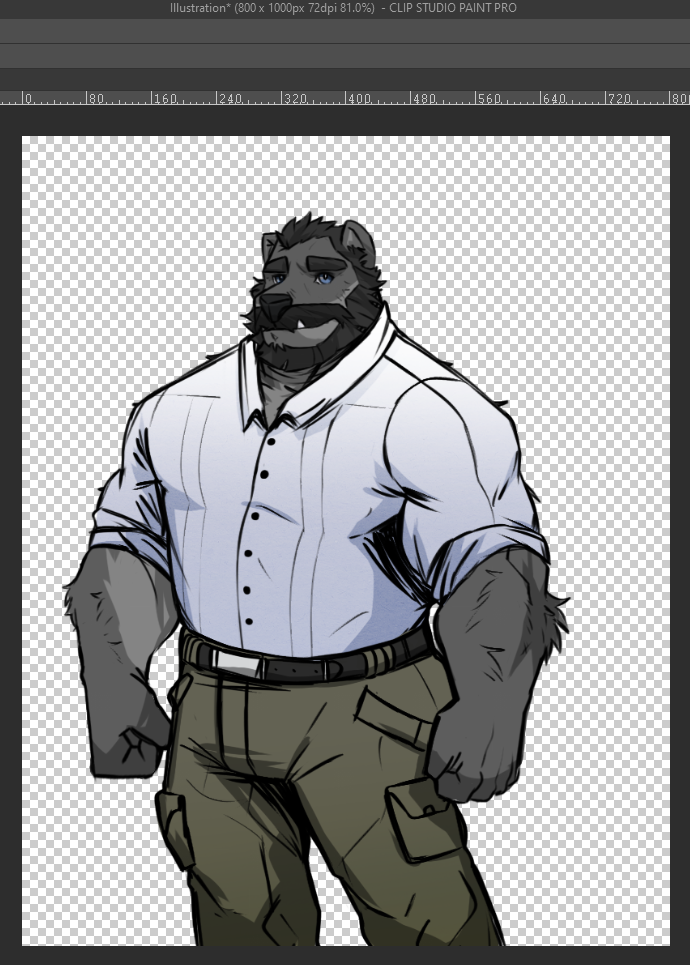
For example, for Mike, here’s his shirt. The entire image fitting Mike is 800x1000 px, so his shirt on its own will be at the position it’d be if he was also there. This is to make sure it’s not floating off randomly to the side.
Of course, we save every layer of the LayeredImage in its own file. I recommend .png, some would recommend .webp to save space.
Please note, since ren’py tries to automatically match images/sprites to file names *if they have a space in them* avoid using spaces in the file name.
e g if I named mike’s shirt “mike shirt.png” and did ‘mike shirt “hi!”’ to show mike with his shirt, it’d *only* show the shirt. To work around this, use underscores instead of spaces in file names. “mike shirt.png” -> “mike_shirt.png”
*Optionally, I would recommend having the same px height/width for all your characters after blank space, as this will help in positioning your characters for scenes etc.
Suggested Setup
Aside from the aforementioned clothes order being sprite specific (shirt before pants), I really recommend splitting it up in the following way:
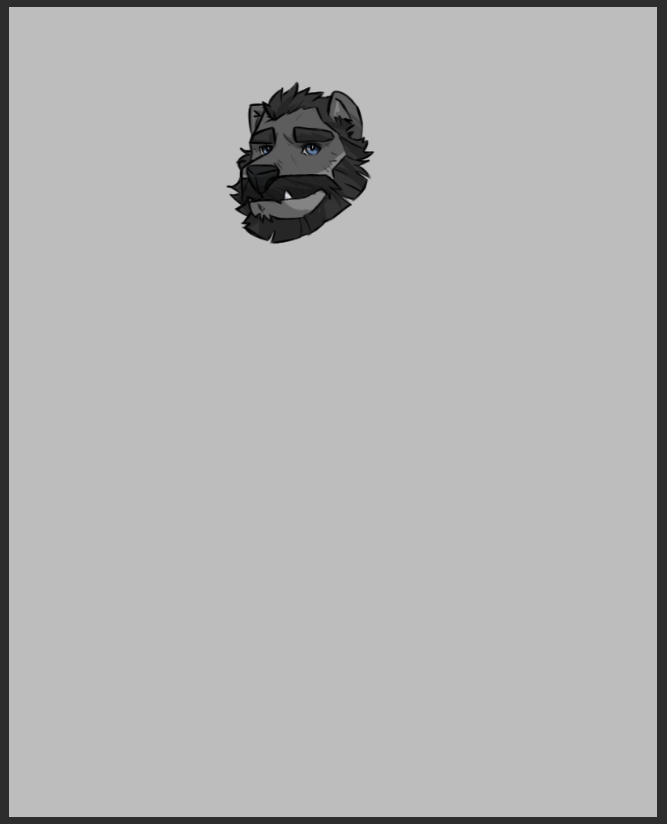
- Body on it’s own, without expressions. I wouldn’t recommend including the head here, as tilting a head and so on can change so much if it’s an expression on it’s own.
- Clothes, in order depending on how they fit the best as drawn. I use shirt -> pants -> outerwear
- Expressions (The entire head, in my case.)
- Extras (hats etc)
For the code example, the snippet I used above fits. The images look like this for you visual people.


Congratulations! You have a very basic LayeredImage set up!
Remember to tie your layeredimage to the character in the character definitions by using “image=”
define mike = Character(("Mike"), color="#ff4242", image="mike")
You *could* go ahead and use it in your game, but you’re not yet taking advantage of anything other than the layer structure. To try and explain the usage of layer structures simply, since it’s a LayeredImage with the prefix mike, you can add / remove any attributes with the show statement in your script. Simply add the attribute in if you want to add it in. If you want to remove it, add a minus sign before the attribute.
show mike pants tshirt neutral body
mike happy "Oh?"
mike -tshirt "It's pretty warm... Don't mind if I just... take my t-shirt off."
show mike -pants with dissolve
mike "Wha? Where'd my pants go?"
show mike pants "Phew, they stayed on."
On a side note, if you don’t use minus signs it’ll remember the attribute from the image.
E g;
I use
show mike pants tshirt neutral
at the start, and then I simply want to change his expression to “happy” from “neutral”. As those are in the same group, I can simply write it in the next line.
mike happy "Oh?"
It’ll remember that the attributes “tshirt” and “neutral” are active.
Extended functionality & the cool stuff
It’s time to automate things! For example, I don’t want to have to specify the fact that his body is to be shown every time. For this, we can either use the somewhat (in my eyes) redundant always statement, or use a default.
default has more uses and is faster in my opinion, so we’ll be using that.
First off, default is a tag (*arg for you pythonians) that we can add into the attributes of our LayeredImage.
It will make it so that that attribute is always loaded, unless another attribute from the same group is shown. It will also make it so that if you remove the non-default attribute, it will default back to the default attribute. First, let’s add it to his body so it’s just always loaded.
    group body:
        attribute body default:
            "sprites/mike/expressions/mike_body.png"
That’s it. Since there’s no other attribute in the body group, it will always show that attribute.
This means we no longer have to specify it when showing the image.
So instead of
show mike pants tshirt neutral body
We can simply do
show mike pants tshirt neutral
Technically, the “attribute body” doesn’t have to be inside a group because it’s on its own, but I suggest using groups anyway for simplicity.
Now, we can apply the same thing to his head/expressions.
    group expressions:
        attribute neutral default:
            "sprites/mike/expressions/mike_neutral.png"
        attribute happy:
            "sprites/mike/expressions/mike_happy.png"
        attribute sad:
            "sprites/mike/expressions/mike_sad.png"
We’re yet one attribute lower, it’ll always remember his body and default to his neutral expression.
show mike pants tshirt
mike happy "Oh?"
otherchar "You're ugly!"
mike sad "Oh..."
otherchar "I was kidding!"
mike -sad "Oh."
This starts with showing mike with his neutral head, changes his expression to happy, then replaces happy with sad, and since neutral is defaulted, removing sad will result in him being neutral again.
If statements (ConditionSwitch lite)
Another thing is that LayeredImages supports its own type of If Logic.
There’s if, if_any, if_not and if_all.
if is much weaker than what you’re probably used to. It’s used outside groups and attributes meaning only one image can be displayed at a time with an if in a LayeredImage. Here’s a code example that shows a tattoo if $ mike_has_tattoo is true.
layeredimage mike:

    group body:
        attribute body default:
            "sprites/mike/expressions/mike_body.png"

    group shirts:
        attribute shirts:
            "sprites/mike/shirts/mike_shirt.png"
        attribute tshirt:
            "sprites/mike/shirts/mike_tshirt.png"

    if mike_has_tattoo:
        "sprites/mike/mike_tattoo.png"
    else:
        Null()

    group pants:
        attribute pants:
            "sprites/mike/expressions/mike_pants.png"
        attribute shorts:
            "sprites/mike/expressions/mike_shhorts.png"

    group expressions:
        attribute neutral default:
            "sprites/mike/expressions/mike_neutral.png"
        attribute happy:
            "sprites/mike/expressions/mike_happy.png"
        attribute sad:
            "sprites/mike/expressions/mike_sad.png"
Overall, I’d highly just recommend using a group, an attribute and ConditionSwitch instead ConditionSwitch official Ren'py Documentation An example using ConditionSwitch would look like this:
layeredimage mike:

    group body:
        attribute body default:
            "sprites/mike/expressions/mike_body.png"

    group shirts:
        attribute shirts:
            "sprites/mike/shirts/mike_shirt.png"
        attribute tshirt:
            "sprites/mike/shirts/mike_tshirt.png"

    group mike_tattoo:
        attribute tattoo default:
            ConditionSwitch(
                'if mike_has_tattoo == True', "mike/mike_tattoo.png",
                'if mike_has_tattoo == False', Null()
            )

    group pants:
        attribute pants:
            "sprites/mike/expressions/mike_pants.png"
        attribute shorts:
            "sprites/mike/expressions/mike_shhorts.png"

    group expressions:
        attribute neutral default:
            "sprites/mike/expressions/mike_neutral.png"
        attribute happy:
            "sprites/mike/expressions/mike_happy.png"
        attribute sad:
            "sprites/mike/expressions/mike_sad.png"
The benefit of this is that we still have full access to what I’m to go through next (if_not, if_any, if_all), and we can also use longer if statements with multiple checks.
If_not, if_any and if_all
Finally! Conditions of LayeredImages.
You might have noticed above that Mike’s body is cutting through his shirt in the example image.
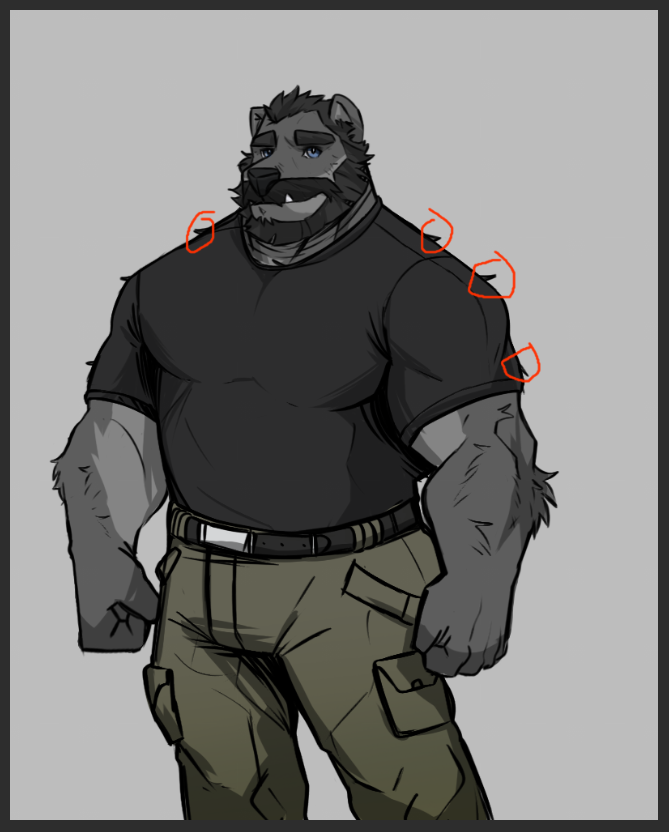
This kind of sucks. I’d like to fix this, but I still like the fact that the fluff is there when he’s shirtless. For that, we can use the conditionals for a LayeredImage. They’re used kind of like default, but they’re used in groups, not attributes. Arguably, attributes take these conditionals as well (according to official documentation), but for simplicity we’ll do it on group level.
Layered Images — Ren'Py Documentation (renpy.org)
if_not if_any if_all
I’ll start by preparing a second “body” image, that has no fur sticking out in these places. One that will only be shown if he’s wearing a shirt.
Once that’s done, I’ll use the above attributes to dynamically change the “body” attribute to load the correct body depending on what attributes are shown.
We could do this manually by simply adding another attribute, but with default we’d like to automate it. So, we use if_any on one group, meaning it’ll return true and therefore show up if any of the listed attributes are shown. if_any[“shirt”, “tshirt”]
At the same time, we want to show the shirtless version if there’s none, so we’ll use if_not with the same attributes in the conditionals. Since the attribute is defaulted, it’ll also always show up.
layeredimage mike:

    group body if_any["shirt", "tshirt"]:
        attribute body default:
            "sprites/mike/expressions/mike_body_nofur.png"

    group body if_not["shirt", "tshirt"]:
        attribute body default:
            "sprites/mike/expressions/mike_body.png"


    group shirts:
        attribute shirt:
            "sprites/mike/shirts/mike_shirt.png"
        attribute tshirt:
            "sprites/mike/shirts/mike_tshirt.png"
Similarly, if_all will have to match all arguments. We can get pretty advanced with this as well, for example if there’s a variant of a hat that only shows up if the character is wearing both a jacket, and is angry (because the ears change, or such), but never shows up if he’s wearing a coat.
To achieve this, simply add another argument in the same line. The order does not matter.
    group body if_any["shirt", "tshirt"] if_not["cloak"]:
        attribute body default:
            "sprites/mike/expressions/mike_body.png"
Now, remember what I mentioned about outliers? If I had a shirt that was on a different layer than other shirts, let’s say I randomly want his shirt above his pants, this is what I’d do. I’d add an if_not and list the regular shirt group/attribute there, so both shirts don’t show up at once.
If we want to go further, we can adjust the layer order and then name the attributes and groups the same thing, then add conditionals so for example the shirt is outside the pants only if the attribute “tired” is active. Null Images
I had no idea where to put this. Sometimes it’s been fairly useful to use NullImages. For example,some of my characters have a watch that they almost always have on. I don’t wanna write this every time I show the character in script, so instead I flip it around and show a null image.
    group watch:
        attribute watch default:
            "sprites/mike/watch.png"
        attribute no_watch:
            Null()
So, if I *dont* want the watch, I’ll “show mike no_watch” instead.
You might also have seen me use a NullImage in the condition switch before.
SideImage and LayeredImageProxy Finally, a lot of people like their Side Images. I’m not different. For a side image, we can use something called a LayeredImageProxy, it quite simply copies the LayeredImage and shows it again, for a side image for example.
image side mike = LayeredImageProxy("mike", Transform(crop=(120, 50, 400, 350), xzoom=-1.0))
To explain the above statement, we set the prefix “side” (default in renpy) for image “mike” to use a LayeredImageProxy of the image “mike” (we defined LayeredImage mike when writing our LayeredImage). We then crop it in x, y, width, height. So we remove 120 blank pixels from the side, 50 blank pixels from the top, and then cut a square that’s 400 x 350 px. We then xzoom -1.0 to flip this and use it as our side image.
ATL on groups
LayeredImages take transforms and ATL directly in the code. Let’s say everytime Mike puts on his tie, it’s a magical tie and he calls it in from the void.
    group tie:
        alpha 0.0
        linear 1.0 alpha 1.0
        attribute tie:
            "sprites/mike/tie.png"
Jokes aside, the main use for this is for asymmetrical characters. For example, I have a character that has a scar on one side of their face. So if I want to flip them, a xzoom -1.0 mirrors them wrongly.
What I did to solve it was add a group with a NullImage called flip.
    group flip:
        attribute flip:
            Null()
This let’s us write “show mike flip”, and then automate what image shows up depending on if flip is active. Now, I went all the way and made the body and face etc automatically flip when this happens, but due to blank space it offset the character a bit from the head with the scar image. I fixed this with ATL and if_not and if_any statements, so when writing my script all I have to think about is “show mike flip” or “show mike”.
layeredimage mike:

    group body if_all["flip"] if_any["shirt", "tshirt"]:
        xzoom -1.0
        xoffset 10
        attribute body default:
            "sprites/mike/expressions/mike_body.png"
    group body if_all["flip"] if_not["shirt", "tshirt"]:
        xzoom -1.0
        xoffset 10
        attribute body default:
            "sprites/mike/expressions/mike_body_nofur.png"


    group body if_not["flip"] if_any["shirt", "tshirt"]:
        attribute body default:
            "sprites/mike/expressions/mike_body.png"
    group body if_not["flip", "shirt", "tshirt"]:
        attribute body default:
            "sprites/mike/expressions/mike_body_nofur.png"
Over'n'out, G
Comments
Log in with itch.io to leave a comment.
A very nice guide, thank you!
I'm having trouble using transforms they way you have. No matter what I write on the second line, it tells me "end of line expected".
However, if only a single line is used, eg: alpha 0.0, it will work. But obviously that's not what I want to do. Any suggestions?
Hi!
This sounds like a syntax issue, `end of line expected` usually indicates you've forgotten the colon on the previous line or that your indentation("tabbing"/whitespace) is off.
From what you're describing, it's likely to do with the colon or definition. (e.g image = vs image:)
There's some information in the ren'py docs (specifically the part about "blocks", but if you need more specific help feel free to send me an image of the specific code that's not working and I'll help you out
Thanks for the offer! I’ve been working in the engine for about six months or so now, and I’ve become decently familiar with the scripting syntax. But layered image syntax is still giving me a headache.
Anyway, I opted to make a python function for this instead as I also want to keep track of what clothing slots are being worn, and write it on a single line of code.
Long story short, I’m using a dictionary and for loop to assemble the show statement dynamically with the transition, while also flipping True/False onto each clothing change.
An example use looks like this now:
$ change_clothes(top=True, top_name=“Tshirt_1”)
Which is much easier for my peanut brain to handle.
Oh, that seems very nice! Definitely a more logic friendly result than base layered images.
I'm actually piggy-backing off of the layered image logic. But I wanted to be able to put conditionals in the script with different reactions or dialogue choices depending on what's being worn.
One issue I still haven't solved is preventing a new background image from hiding the layered image. For now, my workaround is to make the background the "base" layer with the character on top, but at some point I'll have to resolve that issue.
My prologue is more interactive fiction than visual novel. But I want future episodes to incorporate more than one character on the screen at a time, and for that I'll have figure out what I'm doing wrong with backgrounds.
In any cause ,your tutorial was invaluable to me getting layered images set up. I didn't even know they existed in Ren'py until your tutorial popped up in a google search.
Thank you!
Random itch.io post vs official Renpy documentation:
(What a huge surprise that yours is far more helpful lmao)
Thanks a ton!! I'm sure my readers will be happy when the file size shrinks to a fraction of what it is.
OH MY GOD THANK YOU SO MUCH FOR THIS! I've been struggling to layer things and found this in my search.
THANK YOU SO MUCH FOR THIS GUIDE. idk if you know this but it's currently the second result on google for "renpy layered sprite" and it was exactly what i wanted to see, sometimes ren'py's documentation just makes my eyes glaze over lol
Edited to add: if you use drawing software that doesn't allow batch export of individual layers, you can save as a PSD and use Krita to do it! it will even folder them for you.
thanks to this handy guide, i was able to set it up in just a couple minutes. which helped me to submit my novembear entry on time. ^^
Heck yeah! Glad to hear it \o\
Thank you for making this! I'm a newbie to Renpy so this was incredibly helpful--especially the tips about ordering the layers and making the entire head separate for emotions instead of just the facial features!
Happy to hear! Best of luck with your project \o\
this is incredibly helpful and helped me with making my own layered portraits! thank you for taking the time to write it down!!!
You're welcome! I'm glad it helped.
/G
I just wanted to say thank you, this tutorial's super helpful and if you don't mind me asking how'd you learn all these tricks? I recently teamed up with a buddy of mine to speed up and generally improve the lil furry rpg game thing we're making and we're struggling a lot with character creation because we want to get it right, you know? but neither of us know much about layered images, we may be missing something in the documentation or something, and any tips you have would be super appreciated! its okay if you don't have the time to though no pressure. this tutorial alone is SO SO SO Helpful, this is AMAZING and honestly probably one of the best tutorials on the internet for using layered images (especially the more advanced tips!) thank you so much for taking the time to make this <3 you're a treasure!
Hi there, and thanks for the kind words!
I don't think there's any easy way to learn it, other than try and look at existing code and learn from it.
It's mostly experience and messing around with it for a long time. As a side note, Ren'py (fairly) recently did update their documentation to be more thorough - so if you haven't looked at it recently I'd recommend that!
I think the best advise I have to offer is "how to ask a programming question" - meaning don't ask about your exact problem if you're stuck, ask about what you're trying to achieve, your end goal. This goes for when you get stuck in whatever you're doing for yourself as well, there's likely another angle to achieve the same thing that might make more sense, especially so in Ren'py.
I'll see about uploading some more details about stuff I've done to DT the closer I get to releasing the game. Aside from that, if you get stuck and have any questions - feel free to DM me. Most easily reached through twitter or discord.
/Grunt
WHOA thank you so much for taking the time to respond and so quickly! This is all really great advice! you're so kind! I really look forward to seeing what you come out with next! Good luck on your projects! And thank you so so so much for offering to let us ask questions! If we ever get too stuck it's great to know there's someone who knows what they're doing we can turn to! Thank you s much Grunt! I hope you have a blessed day, thank you again! <3!
Damn, thank you so much! This was so well explained and exactly what I needed
Happy to hear! Good luck with your project \o\
Bless you gay furry dating sim creator for having a beautiful explanation of this specific function! Extremely useful for me :O thank you <3
You're welcome! Very glad it helps \o/
I just wanted to thank you so freaking much!! ;u;
I was legit trying to find someone that explained it in a solid crystal clear way with code examples, and I'm so happy seeing this. :) Makes so much more sense and now my spriting will go a lot smoother. Again, tysm!
You're welcome! Happy to help
/G